

Welcome back to the third article of the “Bloom filter” series. This article will discuss a case study of using a bloom filter in a distributed system. The source code shared will simulate the challenge of keeping the bloom filter in sync. This code is written in Flask, which gives a fair idea of the synchronization challenge of a bloom filter. If you are new to the concept of a Bloom Filter, I suggest you go through the following two articles I shared.
Bloom Filter — Part 1
Bloom Filter — Part 2
To keep this article’s length in check, implementing a “scalable bloom filter,” mentioned earlier, will be shared in the next article.
After reading this article, you will learn about…
A use case where we use the Bloom filter to validate the existence of data before it checks a database.
The challenge of keeping different copies of a bloom filter in sync in a distributed environment
Two potential solutions to address the challenge
Program(s) to simulate the situation of bloom filter inconsistency and how this program addresses this issue.
Some patience while running the code if you are new to Flask.
Use case scenario
Let’s consider a practical use case. We have a website where users create unique usernames during registration. Currently, we have one Web server managing the user interactions with a cache that maintains a bloom filter for all the usernames. When a user selects a new username, the application checks for its existence in the bloom filter. If the username has already been taken, the user is prompted to choose a different one. If the username is unique, a new user record is created in the system. This process of checking for a username in the cache is lightning-fast. Here’s a graphical representation of the scenario.
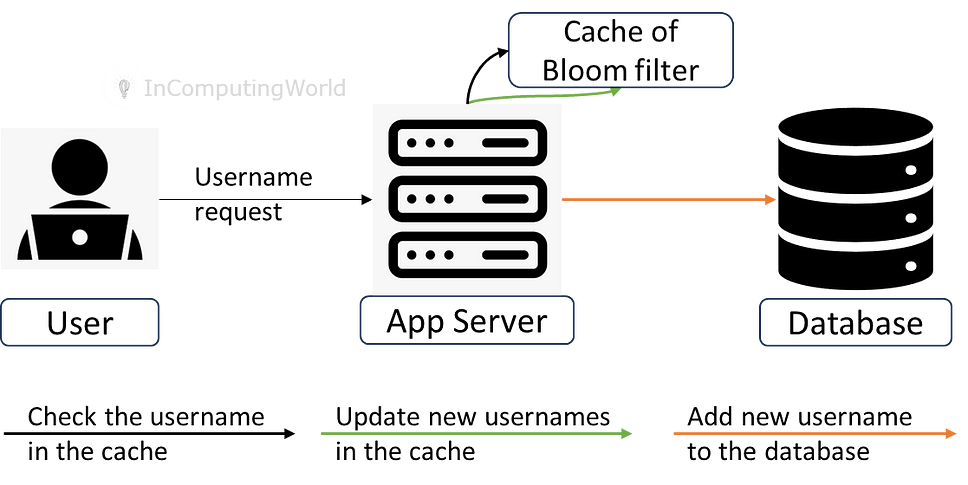
Our website has gained popularity, and the user base is growing rapidly. To handle the increased load, we’ve opted for horizontal scaling and added a second server. Now, both servers maintain their cache of bloom filters. This has improved the system’s speed but also introduces a new challenge. Let’s explore this challenge in more detail.
Since we now have two separate caches of Bloom filter on two separate notes, sending a new user creation request to the database with an existing username is possible. For example, a user with a username set to “India101” is created using the first Web server. Now, on the second Web server, when I try to create another use using username “India101”, the bloom filter will indicate that no such entry exists and allow us to send a user creation request to the database. Eventually, the request fails as the username already exists in the database.
This happens because the bloom filters of the two servers are not in sync. We must ensure that both bloom filters are in sync. There are multiple approaches. I am sharing two, and these are…
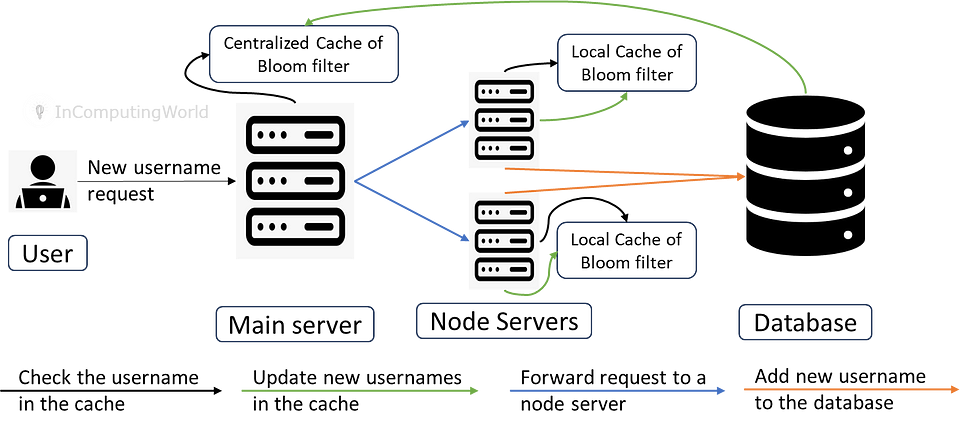
We maintain a centralized cache.
We maintain a centralized cache, and the server acts as a load balancer.
When a new username request comes in, it is first checked for in the centralized cache. If it does exist, we ask the user to create a new username and send the request again.
The request is sent to one of the nodes if the username does not exist in the centralized cache.
The node again checks for the username in its local cache. The request is not processed if the username exists on the local cache. A user is requested to create a new username.
The request is taken forward if the username does not exist in the local cache and a new entry is added to the database.
Once the entry is in the database, the local cache is updated with the new username.
The new usernames are shared with the central cache, which updates its Bloom filter with these entries. We store these new entries in a database table.
The frequency of sending this information to a table can be immediate or at a certain interval.
At a certain frequency, the central cache shares its updated bloom filter by adding a database table; a node accesses this table to update its bloom filter and stays abreast with all the entries.
Whenever a new node starts, the load balancer shares the cached bloom filter to the node. Considering this to be the most updated cached bloom filter.
When you execute the code, considering we have three separate copies of the bloom filters, you will observe how the three copies differ.
We do not maintain a centralized cache.
When a new username request comes in, the load balancer passes it on to one of the node servers.
The node checks for the username in its cache. If the username exists in the local cache, we ask the user to create a new username and send the request again.
The request is taken forward if the username does not exist in the local cache and a new entry is added to the database.
Once the entry is in the database, the local cache is updated with the new username.
The new usernames are then shared by updating a table that other nodes use to update their bloom filters.
The frequency of sending these bits can be immediate or at a certain interval.
Whenever a new node starts, it creates its cached bloom filter by reading the usernames from the database.
Note: This article explains the consistency issue when implementing the bloom filter in a distributed environment using a centralized cache (the first approach). The code is written in Python (Flask applications), has been tested on a single machine, and tries to simulate the situation. I have written the code to be easy to understand.
Before we delve into the code, the following is the pictorial representation of the implementation.
Code implementation
Database
The database maintains three tables. Following is the description of these tables.
Users — This contains all the usernames. Node servers add an entry to this table.
Pending_users — This table contains the new users added to the database by any node server. The main server reads this table and updates its centralized bloom filter at a given frequency.
Sync_filter — After reading pending_users, the main server adds a new entry to this table with the updated bloom filter. Node servers read the most recently added row to sync their bloom filter.
Preparation to execute this code.
MySQL server and Workbench or any other table query tool.
Python and related libraries installed (refer to the requirements.txt file shared with the code). I used Python version 3.12.5 to write the program.
PyCharm or any other IDE to play around with the code.
Workable knowledge of Python and Flask.
And a little bit of patience.
Understanding the folder structure.
Database — There are two files under this folder.
First is the schema.sql. Contains the table definitions.
Second is the test_data.sql. It is the base data I added before I executed the application.
You must create a new database using MySQL. I have named it dist_bf. If you give it a different name, you must change the code.
After creating the database, execute the two SQL files. Now, the database is ready.
main_server — This folder has the code of main_server.
Config.py contains the configurations needed to run the server. The application maintains a dictionary “app.config” for it.
EXPECTED_ENTRIES — is the number of entries the bloom filter should have.
ERROR_RATE — This is the acceptable error rate for this bloom filter. It is set to 1%.
Note: these two entries must be identical for the main and node servers.
UPDATE_FREQ — is the frequency in seconds when the main server updates its bloom filter by reading data from “pending_users” and updating the table “sync_filter.”
MAIN_SERVER_NAME — is the name of this server. You can set any name of this server.

Note: This is a partial list of configurations. The code file mentions many of them.
main_server.py — This contains the main server code. It does the following activities.
Initializes the flask application.
Database connection using pymysql library.
Schedules a job using the APScheduler library.
Initializes the Central Bloom filter with the data added in the table “users.”
Defines routes.
One is for node servers to register with the main server.
The second is for the end user to request a new user creation.
When the application starts, it creates a Bloom filter using the data from the users table. Once this is created, the application adds a new entry in the sync_filter table for the node servers to read this data.
operations.py — This file keeps the main_server.py file easy to read. It contains the following functions.
add_this_bf_to_sync_filter — This function adds a new entry in the “sync_filter” table when the server creates a Bloom filter. It contains the bits of the bloom filter.
check_bf_add_new_user — This function forwards a user creation request to one of the available node servers.
Before sending this request, it checks whether the node servers are available. Then, while forwarding a user creation request, it randomly selects a node server.
Second, it checks its bloom filter for the username and forwards the request when it does not exist in the Bloom filter.
periodic_update_from_pending_users and periodic_update_to_sync_filter — Both functions are called periodically by the APScheduler library. It is configured in the file “main_server.py.
You must start this server before you start running the node servers. To run it, use the following command: flask — app main_server run.
Before you execute the above statement, ensure the following points are followed.
Your current working folder should contain the file “main_server.py.”
If you are using a virtual environment, ensure that this environment is active.
Alternatively, you can run the server using PyCharm IDE.
node_server — This folder contains the code for the node server. We can execute multiple copies of this application.
Config.py contains the configurations needed to run the server. The application maintains a dictionary “app.config” for it.
EXPECTED_ENTRIES — is the number of entries the bloom filter should have.
ERROR_RATE — This is the acceptable error rate for this bloom filter. It is set to 1%.
Note: these two entries must be identical for the main and node servers.
SYNC_FILTER_FREQ — is the frequency in seconds when a node server updates its bloom filter.
NODE_NAME — is the name of this node server. You can set any name of this server.
NODE_URL — is this node server’s URL and port number.

NOTE: You must change the name and URL of a node server whenever you start a new instance.
This is a partial list of configurations. The code file mentions many of them.
node_server.py — This contains the node server code. It does the following activities.
Initializes the flask application.
Database connection using pymysql library.
Schedules a job using the APScheduler library.
Registers itself with the main server.
Initializes the local Bloom filter from the “sync_filter” table.
Defines route to add a new user.
When the application starts, it registers itself with the main server and passes its name and URL to the main server. The main server uses this information to route the user creation request. The next step is to initialize its local bloom filter by reading the most recent row of the table “sync_filter.” Now, the application is ready to accept user creation requests.
Operations.py — This file keeps the node_server.py file easy to read. It contains the following functions.
register_with_main_server—This function sends a registration request to the main server. While making this request, it shares its name and URL with the main server. REST API is used to forward this request.
initialize_local_bloom_filter_from_database — This function reads the most recent update to the table “sync_filter.” It uses the bits from the record and “ORs” it with its local bloom filter. This “OR-ing” merges the new usernames with the existing ones. This is implemented in the function “calibrate_bloom_filter.”
check_bf_add_user_update_pending_users — This function initiates three separate activities once the node server receives a user creation request from the main server.
Check the local Bloom filter for a user. If it exists, it sends a message stating that the user name has already been taken.
Attempts to add a new user. It may happen that another node server has created the same username, and the node servers’ local bloom filters are not yet in sync. This causes an error while adding a new record to the database. The user is informed that a username has been taken. The function name is “add_new_user.”
The third step is initiated when a new user is created in the users table. In this step, a new entry is made in the pending_users table. This is an indication that the main server will sync its centralized cache. The function name is “update_pending_users.”
update_local_bf_with_main_server_bf — This function is called periodically to check for new entries made in the sync_filter table. This function will pick a row to update the local bloom filter only when the most recent bloom filter data is not “OR-ed” with the local bloom filter. This “OR-ing” is implemented in the function “calibrate_bloom_filter.”
update_sync_filter—When the local bloom filter is successfully updated, this function marks the row the node server used to update it. It ensures that there are no repeat updates of the same data.
You must start this server after you start running the main servers. To run it, use the following command: flask — app node_server run port — 8000.
Before you execute the above statement, ensure the following points are followed.
Your current working folder should contain the file “node_server.py.”
If you are using a virtual environment, ensure that this environment is active.
Alternatively, you can run the server using PyCharm IDE.
Ensure that you update the config.py file with the appropriate Node name and the URL of the node server before you start with another instance of the node server.

I have tested this application by running the servers (one main server and three node servers) using command prompts.
Added a few test files to the main_server folder. Once all the servers are up, you can run these files in parallel, each at a separate command prompt. While executing these test files, query the tables to observe how different node servers create new users. And how this changes the synchronization of the three bloom filters. You can observe the output statement of each node server sharing the status of the bloom filter.
You will also notice a few examples of “False-Positive” while executing these test files. Tweak the “EXPECTED_ENTRIES” to a lower value, say 100.
Added a sleep statement to all these files. You can tweak these numbers to ensure the application server is not overwhelmed by the requests.
Coming up…
In the next article, I will share the implementation of a “scalable bloom filter.”
References
Did you enjoy this article? Please like it and share it with your friends.
If you have found this article helpful, please subscribe to read more articles.
Feel free to comment!!
Very informative. 👍👍