
Bloom Filter - Part-1

Introduction
Consider a situation where you must search for a particular word from a list of millions of words. How would you do it fast? Let’s add one more complexity: this list of words is not sorted.
Or think of a website with thousands of articles, and you, as a subscriber, are recommended the articles that are either the latest or still need to be read. How does a website maintain this information for all the subscribers?
Or, while creating a profile on a website, how quickly you learn about a username has already been taken.
How do you think Google Chrome warns you immediately when you type malicious site details?
Will any existing search mechanism work here efficiently?
Fortunately, we have a mechanism that helps us search for a particular word or phrase: the Bloom filter.
What is a Bloom filter?
Bloom filter is a space-efficient, probabilistic data structure conceived by Burton Howard Bloom in 1970 that is used to test whether an element is a member of a set. [Wikipedia]
For example, if we are looking for a username on a particular website, the “set” is all the existing usernames, and the “element” is one of the usernames we are looking for.
Probabilistic data structure
When we say “probabilistic,” we mean that the element we are searching for in a set either “possibly exists in the set” or “does not exist in the set.” It does not give a definitive answer. It provides a probability that an element may exist.
If we are not getting a definitive answer, what is the benefit of using this data structure?
Space-efficient and fast
The main benefit of using this data structure is that it is space-efficient and very fast, and we agree with this tradeoff against the accuracy of the data structure. Imagine that Google maintains a list of all the malicious sites found on your local machine, using a limited amount of memory, and highlights one while you are typing it in a browser. It is better to be safe when it wrongly marks a one-off site as malicious, though it is not.
Or consider that you are creating a new username on a website with billions of existing users and learn that a username has already been taken within a fraction of a second. Remember, a query on a database to check for an existing username takes more than a second. It is “OK” with a one-off situation where a username has been wrongly marked as taken compared to the speed with which we are reverting to a user.
Understanding the probability–confusion matrix
Now, we will learn about the terms we use when discussing the probabilistic nature of this data structure. What do we call a situation when looking for an element that does not exist in the set? Or when it exists in a set. It is called a confusion matrix. As the name suggests, it can be confusing to understand initially.
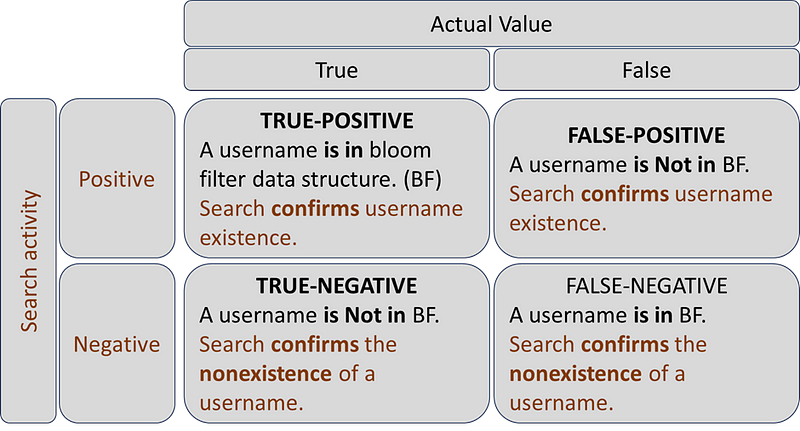
Considering the same example of identifying a username that already exists on a website, all the existing usernames are added in the Bloom filter data structure (BFDS), and a new username is looked for in the data structure before it is created. The confusion matrix has four different conditions, which are…
1. True — Positive. When a username is in the BFDS. Checking for a username in the BFDS confirms its existence.
2. False — Positive. When a username is Not in the BFDS. Checking for a username in the BFDS confirms its existence.
3. True — Negative. When a username is Not in the BFDS. Checking for a username in the BFDS confirms its non-existence.
4. False — Negative. When a username is in the BFDS. Checking for a username in the BFDS confirms its non-existence.
While working with a Bloom filter, it is possible to get a “False-Positive.” This is the trade-off between speed and space efficiency against the accuracy.
It can also give an output of “True-Positive” and “True-Negative.” And it does not give a “False-Negative” result.
The following figure gives a matrix view of the above.
Understand the workings of a Bloom Filter
Bit array
Bloom filter is a bit array of a finite number of bits. Generally, this number is represented as m. Initially, all the bits are set to 0.
Hashing
Bloom filter data structure is based on hashing. Hashing is a way of converting some data to another value using a mathematical formula called the hash function. The outcome of this hash function is a hash value. Other names are digests, hash codes, or hashes. Irrespective of the length of the input data, this hash value is always a fixed-length output.
A hash value maps each element (in our example, the usernames) to a bit array. We use more than one such hash function to map each element to the bit array. The number of hash functions used to store each element in a bloom filter is represented as k.
Mapping hash value to bit array
In this mapping process, we set the values of a bit array from 0 to 1 based on the elements we store in the Bloom filter data structure. This has the following steps.
Use a hash function that accepts an input (existing username) to generate a hash value.
Generate a remainder. Apply the modulo operator on the generated hash value by the length of the bit array.
Use this remainder as an index and set the bit at the index position to 1.
We do this step for each hash function we use to map each element to a bit array.
Note: We do not store the actual values (usernames) in the bloom filter. However, we use hash functions to generate a mapping between the actual value and its corresponding index on the bit array.
Now, imagine how easy it is for Google to store information about malicious sites on your browser in a “space-efficient” manner.
Searching for an element in a bit array
When searching for a particular value (in our example, a username), we do not search by its name but by its mapping in the bit array. Once the values are stored in the bit array, a search is done in a similar fashion.
Create a hash value of the input string (using a username)
Generate the remainder. Apply modulo operation on the hash value by the length of the bit array.
Using the remainder as an index. Check the bit value in the given index.
a. If the value is set as 0, it does not exist. It is a True Negative.
b. If the value is set as 1, it exists (True-Positive). For easy understanding.
There is also a probability of getting (False-Positive) results. Later, we will discuss the reason for this and understand ways of reducing this probability.
Mapping in action
With the help of an example, we will now understand how the mapping works.
Inserting data
Define an array of 20 elements. The first row shows all the elements initialized with 0, which indicates that no data has been mapped in this array. The second row is the index number of each element of the array.

Insert the first value in the array. “Hello”.
a. Pass “Hello” to the hash function. HashFunction(“Hello”)
b. The HashFunction(“Hello”) returns a hash value. Assume the returned hash value is 63217.
c. Generate the reminder. Apply the modulo operator (%) on this hash value (63217) by the array’s length (20). The remainder is 63217 % 20 = 17.
d. We now set the element at the index 17 of the bit-array to 1.

Similarly, we add “Hola.” Assume the hash value is 21610. The remainder is 21610 % 20 = 10, and we update the element at index 10 of the bit array.

Adding “Welcome”. Assume the hash value is 71349. The remainder is 71349 % 20 = 09. Update the element at index 9 of the bit-array.

Now, we add “Thank You.” Assume the hash value is 89269. The remainder is 89269 % 20 = 09. Update the element at index 9 of the bit-array.
Note: for the words “Thank you” and “Welcome,” we have updated the same index (9) twice“ Set the value to 1 each time.
Deleting data
A Bloom filter generally does not allow deleting data (remove mapping). Considering the above example, if we wish to remove the “Thank you” entry, we must set the bit array’s corresponding index value (9) to 0. Note that the entry “Welcome” also corresponds to the same index of the bit array. So, if we set the index (9) of the bit array to 0, we will remove two entries. Since one bit can represent more than one element, resetting a bit to 0 can reset more than one element.
However, different flavors of the Bloom filter allow deletion; one is called the “Counting Bloom filter.”
Searching data
For searching, we follow the same process as inserting data. If we wish to search for “Hello”, we pass it to the HashFunction(“Hello”). This will generate the same hash value of 63217. Now, we identify the index using the modulo operator 63217 % 20 = 17. We now check the value of the bit array at the index 17. The value is 1. So, the word “Hello” is there in the bit array.
Now consider a situation of searching for the word “Good Bye,” which has not been added in the BFDS. Assume the HashFunction(“Good Bye”) gives an output of 52310. In this case, the index will be 52310 % 20 = 10. When we check the 10th index, the value of the bit array is set to 1. This is set for the word “Hola”. We will get a positive confirmation of “Good Bye.” This is an example of a “False-Positive.”
Coding time
We will write a Python program to implement a simple Bloom Filter code. This program will create a configurable bit array and use one hash function to map data into it. It will allow you to search for data in the bit array. Finally, it will show how the bits are set when a new element is added to a bit array.
All of this code is available on GitHub as well.
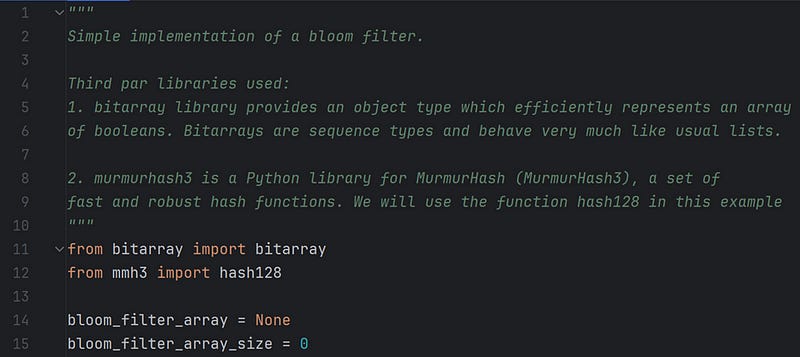
In the above code, we start with using two libraries. First is bitarry, which we use to create a bit-array for our bloom filter. The second is mmh3, and we use the function hash128 to generate a hash value of the data we will add to the bloom filter.
Declare two self-explanatory variables. bloom_filter_array and bloom_filter_array_size.
Now, we will see the execution flow and then get into the implementation details.
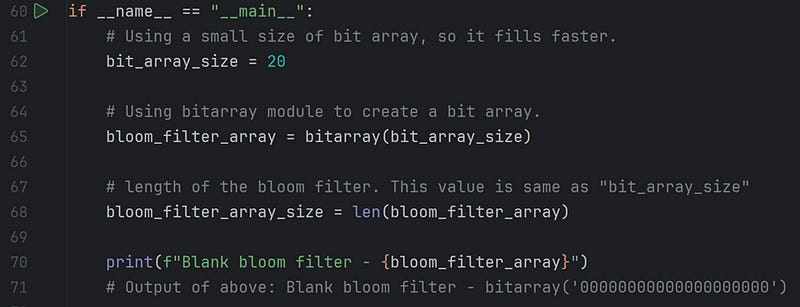
In the above code segment, we declare a bit array size of 20 (m = 20) and initialize it with 0 since we use one hash function (k = 1).
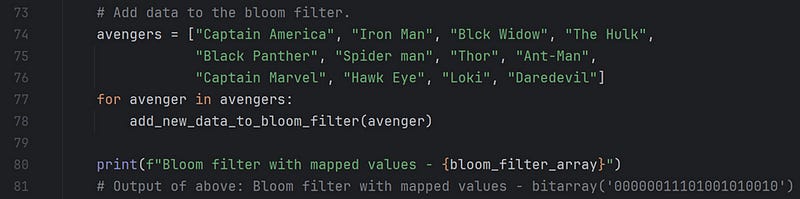
I added twelve entries to the bloom filter in the above code segment. For each entry, an index is mapped in the bloom filter and is set to 1. We’ll see the details in a while.
Note: Since we do not store the actual values in a bloom filter, it is possible to add more entries to the bit array of size (m = 20). However, the probability of getting a False-Positive increases with every additional new entry. In the later sections, we will learn how to control this probability.
Finally, in the code segment below, I demonstrate an example of a False Positive. The BFDS says “True” when we try to find “Super man” in our bloom filter. It matches the index of “Loki” and “Spider man.”

Now, the implementation starts with a call to the function add_new_data_to_bloom_filter(avenger) at #78
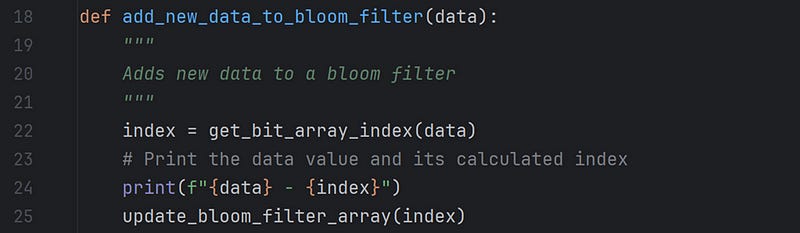
The above function first generates an index of the data passed by calling the function get_bit_array_index(data), prints the same, and finally updates the index of the bloom filter bit array with the value 1 by calling the function update_bloom_filter_array(index).
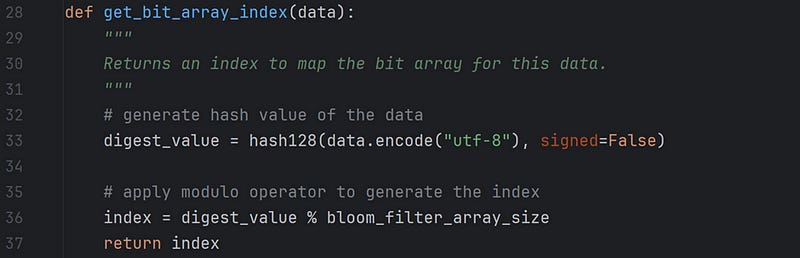
The above function uses the hash function hash128 to generate a hash value for the data. The function accepts the data input as a string, bytes, or array. I have used UTF-8 encoded bytes as input, and the function returns a 128-bit unsigned integer as a hash value. Finally, I use the modulo operator to generate the index of the bit-array for the given input and return this to the calling function.
The next step is to update the index of the bit array with 1, and the function update_bloom_filter_array(index) does the same.

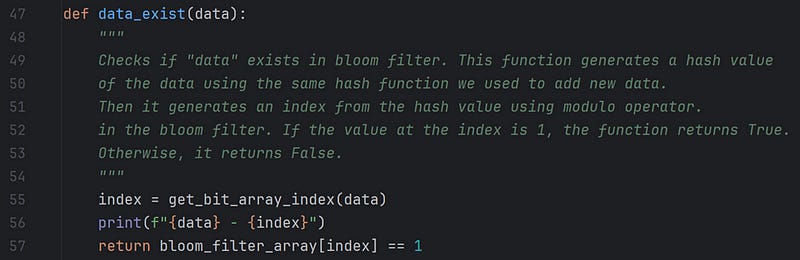
When searching for data in the bit array, the function data_exist(data) does all the tricks.
Please feel free to play around with the code and get a better understanding of the code.
Summary
To summarize our understanding so far…
Bloom filter is a fixed-size bit-array data structure that is probabilistic, fast, and space-efficient.
Bloom filter is based on hashing. It uses hash functions to map the data against the fixed-size bit array.
Since it does not store the actual data but the corresponding mapping, it is possible to store a large amount of data against the fixed-sized bit array.
The chances of getting a “False-Positive” increase as the data increases in a boom filter.
A bloom filter generally does not allow the deletion of data. Though a specialized implementation of the Bloom filter, it is called the “Counting bloom filter.”
Coming up…
In the next article, I will discuss what makes this data structure fast by understanding its complexity in terms of time and space.
We will also understand the math behind managing the probability of “False-Positive.”
References
Did you enjoy this article? Please like it and share it with your friends.
If you have found this article helpful, please subscribe to read more articles.
Feel free to comment!!
Very well written article